First, list connect to the switch using a console cable or Telnet to connect to the switch’s command line interface (CLI). You also might need the credentials to access the switch if they have been configured.
Enter configuration EXEC mode: once connected, enter privilege EXEC mode by typing the following command and proving the correct enable password if security has been configured.
Switch> enable
Enter global configuration mode:
Switch# configure terminal
Now let’s create an access-list using the ‘access-list’ command to create an access list that defines the allowed IP addresses or address. The following example creates an access list named “ACL-IN” that permits traffic from a specific IP address (192.168.1.100):
Switch(config)# access-list ACL-IN permit ip host 192.168.1.100 any
You can modify the IP Address and subnet to meet your requirements. The ‘any’ keyword allows traffic to any destination IP address.
Now lets apply the access list to the management interface. To secure the switch, we need to apply the access list to a management interface, such as VTY lines used for remote management. Use the below commands to apply the ACL to the VTY lines.
Switch(config)# line vty 0 15
Switch(config-line)# access-class ACL-IN in
This configuration applies the access-list “ACL-IN” to the incoming traffic on the VTY lines.
To finish up, lets save our configuration using ‘write’ or ‘wr’ or ‘copy running-config startup-config’.
Switch(config)# write
We have created an access list and applied it to the management interface of the switch. Please remember to replace the IP Address (192.168.1.100) with an IP or Subnet that you would like to have Telnet or SSH access as all other IP addresses will be denied access. Thanks again for visiting Unreal-Labs, make sure to check back soon as our content is always updating.
Verify current settings on switch if any and remove them if found.
Switch Setup
Setting up your hostname
Setting up Telnet
Configuring your enable password
Encrypting your passwords
Setting up your switch IP Address
Setting up Default Gateway
Saving your configuration
Basic port configuration
Setting up access ports
Setting up a Trunk port
Using the Range command
Accessing the Switch:
We need to connect to the switch using either a Cisco USB cable or a console cable with a usb-serial adapter. Most computers today do not come with a serial port anymore so I recommend purchasing a usb-serial adapter. You can find these pretty cheap on Amazon or Ebay
After you have installed the drivers for your usb-serial adapter, we need to setup putty to communicate with the switch. I’m going to be using the below setting for my switch.
Command Modes:
Mode
Symbol
Accessing mode
Exiting mode
User Exec Mode
Switch>
Default Mode, basic show command available
Exit
Privileged EXEC Mode
Switch#
The “Enable” command will move you into this mode
Exit
Global Configuration Mode
Switch(config)#
“Configure Terminal” or “Config t” command from Privileged mode
Exit or Ctrl + Z to move back to EXEC mode
Interface Configuration
Switch(config-fi)#
Use Interface (interface name+number> command from global configuration mode
Exit will move you back to global mode, END will move you back to Privileged mode Switch#
Verify current settings on the Switch:
So, I like to verify the switch is in a fresh configuration, meaning that the switch is in it’s default factory state. If you are unsure I would delete the configurations and reload the switch.
Steps to reload a switch……
Configuring the Switch Hostname:
Alright, let’s move from EXEC mode -> Privileged Mode, (EN or Enable) -> Configure Terminal (Config T). Now type the following command -> Hostname “NAME”.
Switch# hostname 3560-24
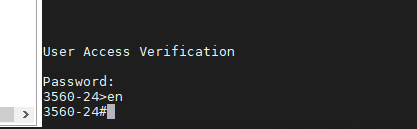
Switch>enable
Switch#configure terminal
Enter configuration commands, one per line. End with CNTL/Z.
Switch(config)#hostname 3560-24
3560-24(config)#
3560-24(config)#
3560-24(config)#
We should now see the CLI change from SWITCH# to 3560-24#
Setting up Telnet:
Alright let’s move into the Global Configuration mode, then into Interface Configuration.
3560-24>en
3560-24#config t
Enter configuration commands, one per line.  End with CNTL/Z.
3560-24(config)#line con 0
We will now be setting line CON 0 with a password and login rights
3560-24>en
3560-24#config t
Enter configuration commands, one per line.  End with CNTL/Z.
3560-24(config)#line con 0
3560-24(config-line)#password cisco
3560-24(config-line)#login
Now lets jump right from CON 0 into VTY 0 4 (Telnet Lines 0 thru 4) and setup the password and login commands.
After we have set both of these up, I like to exit the switch and test to make sure that we can at least get back into the switch before we save to configuration.
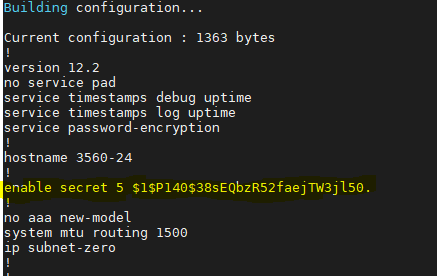
Alright, everything is looking good so let’s configure the Enable password. We will move back into Privileged EXEC mode then into Global configuration mode. Using the command “enable secret <password>” will make our password encrypted. This command does not encrypt our VTY and Con 0 passwords, so we will also run the command “Service Password-Encryption”
3560-24>en
3560-24#config t
3560-24(config)#enable secret cisco
3560-24(config)#service password-encryption
3560-24#exit
Now before you save your configuration. I like to logout and login to verify all passwords are working correctly. Now if you use the command “show running-config” we should see that our enable passwords and line passwords are encrypted.
Setting the Switches IP Address:
We are going to be starting from the EXEC mode and move to the Interface Configuration mode.
3560-24>enable
Password:
3560-24#config t
Enter configuration commands, one per line.  End with CNTL/Z.
3560-24(config)#int Vlan 1
3560-24(config-if)#
Now lets configure Vlan 1 with an IP Address and enable the interface.
3560-24(config)#int vlan 1
3560-24(config-if)#ip address 10.10.10.1 255.255.255.0
3560-24(config-if)#no shutdown
3560-24(config-if)#
17:04:18: %LINK-3-UPDOWN: Interface Vlan1, changed state to up
Now that we have an IP Address on the switch, I also like to setup a default-gateway just in case we have other subnets on our network we need to talk too. If all your devices are on Vlan 1 then you don’t have to do this, but I would highly suggest you do.
3560-24(config)#ip default-gateway 10.10.10.254
Verifying the gateway
3560-24#sh ip route
Default gateway is 10.10.10.254

Host               Gateway           Last Use    Total Uses  Interface
ICMP redirect cache is empty
3560-24#
Saving your Configuration:
Saving your Configuration by either entering “wr” or “copy running-config startup-config”
3560-24#wr
Building configuration...
[OK]

or

(This is the Cisco preferred method)

3560-24#copy running-config startup-config
Destination filename [startup-config]?
Building configuration...
[OK]
3560-24#
Alright, let’s move on to configuring our interfaces with some basic settings.
Basic Access Port:
The two commands we are going to use are “Switchport mode access” and “Switchport access vlan <number>”. The “switchport mode access” command disables DTP – Dynamic Trunking Protocol on the specified interface, which basically turns off trunk negotiation.
3560-24#config t
Enter configuration commands, one per line. End with CNTL/Z.
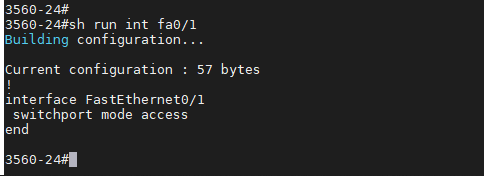
3560-24(config)#int fa0/1
3560-24(config-if)#switchport mode access
3560-24(config-if)#switchport access vlan 1
3560-24(config-if)#
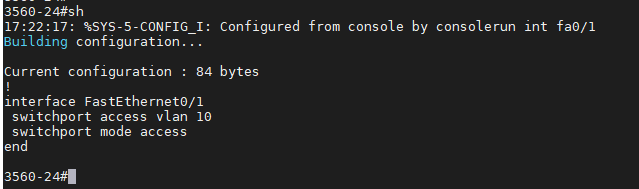
Now lets verify our configuration, you will not see “switchport access vlan 1” as it already in Vlan 1, but if we had configured Vlan 10 we would see it on the port config. By default all ports are in Vlan 1 unless otherwise configured.
Vlan 1:
Vlan 10:
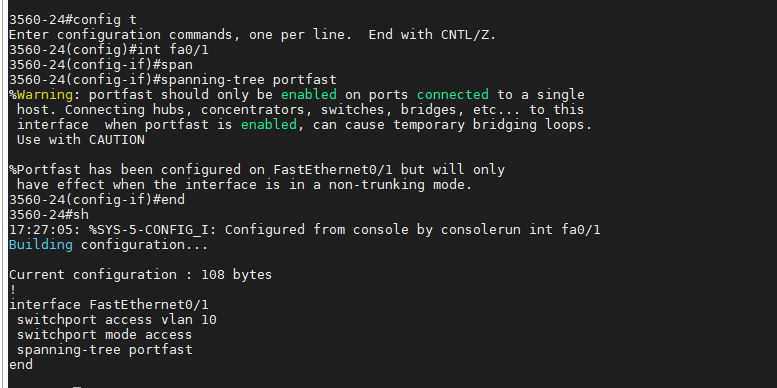
I also like to setup “Spanning-tree Portfast” so the port will come up as fast as possible. You will see a warning message when you enter this command, as it’s important to know not to configure “Portfast” if you are connecting this port to other Hubs, Switches, etc.
3560-24#config t
Enter configuration commands, one per line.  End with CNTL/Z.
3560-24(config)#int fa0/1
3560-24(config-if)#spanning-tree portfast
Here is a screenshot of the warning and the now configured port.
Basic Trunk Port:
This is a basic Trunk port configuration if you have multiple Vans and are needing them to pass to another switch. I’m not going to get into much about trunk ports as I’ll be doing another post and video on this topic, but the below commands will configure a trunk port and pass all configured vlans thru the port.
3560-24#config t
Enter configuration commands, one per line.  End with CNTL/Z.
3560-24(config)#int fa0/2
3560-24(config-if)#switchport trunk encapsulation dot1q
3560-24(config-if)#switchport mode trunk
3560-24(config-if)#end
Verifying configuration:
Extra Knowledge:
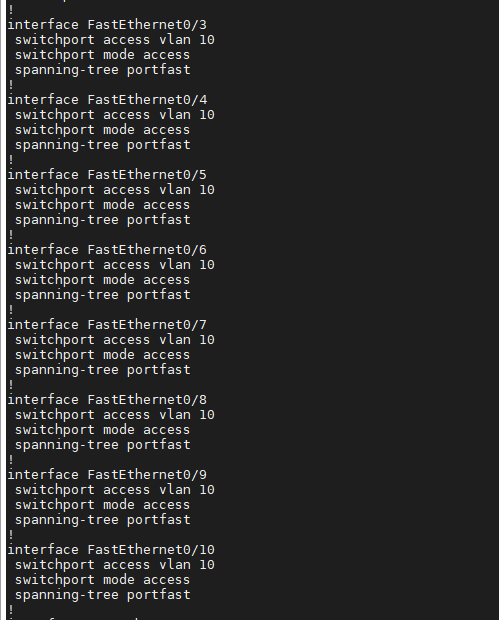
If you want to configure multiple ports at one time you can use the “Interface Range” command to select contiguous ports.
3560-24#config t
Enter configuration commands, one per line.  End with CNTL/Z.
3560-24(config)#int range fa0/3 - 10
3560-24(config-if-range)#switchport mode access
3560-24(config-if-range)#switchport access vlan 10
3560-24(config-if-range)#spanning-tree portfast
You can verify your config using “show running-config” and we will see all the ports configured.


![User Access Verification
password:
3560-24>enab1e
3560-24#de1ete flash: vian .dat
Delete filename [v Ian. dat]?
Delete flash:vlan.dat? [confirm]
3560-24#erase startup-config
Erasing the nvram filesystem will remove all configuration files! Continue? [confirm]
0K]
Erase of nvram: complete
3560-24#
00:03:09: %SYS-7-NV BLOCK INIT: Initialized the geometry of nvram
3560-24#
3560-24#reload
System configuration has been modified. Save? [yes/no] :
proceed with reload? [confirm]'](https://unreal-labs.com/wp-content/uploads/2020/02/image-5.png?w=756)
![This product contains cryptographic features and is subject to United
States and local country laws governing import, export, transfer and
use. Delivery of Cisco cryptographic products does not imply
third-party authority to import, export, distribute or use encryption.
Importers, exporters, distributors and users are responsible for
compliance with U.S. and local country laws. By using this product ymu
agree to comply with applicable laws and regulations. If you are unable
to comply with U.S. and local laws, return this product immediately.
A summary of U.S. laws governing Cisco cryptographic products may be found at:
http://wrw.cisco.com/wwl'export'crypto'tool/stgrg . html
If you require further assistance please contact us by sending email to
export@cisco . com.
cisco WS-C356G-24TS (PowerPC405) ptTcessor (revision DO) with 122886K/8184K bytes of memory.
Processor board ID CAT1018ROXW
Last reset from power-on
1 Virtual Ethernet interface
24 FastEthernet interfaces
2 Gigabit Ethernet interfaces
The password- recovery mechanism is enabled
512K bytes of flash-simulated non-volatile configuration memory.
Base ethernet MAC Address
Motherboard assembly number
Power supply part number
Motherboard serial number
Power supply serial number
Model revision number
Motherboard revision number
Model number
System serial number
Top Assembly Part Number
Top Assembly Revision Number
Version ID
CLEI Code Number
Hardware Board Revision Number
Switch
Ports Model
WS-C356€-24TS
Press RETURN to get started!
73-9897-06
341-0097-02
CAT10172BGN
AZS1€13€80A
WS-C3560-24TS-E
CAT1018ROXW
. 800-26386-62
V02
CO%HO€ARB
ex01
SW Version
SW Image
C356€ - IPSERVICESK9 -M
00:00:24: *LINEPROT0-5-UPDOWN: Line protocol on Interface Vlanl, changed state to down
%SPANTREE-5-EXTENDED SYSID: Extended sysld enabled for type Vlan
%SYS-5-RESTART: system restarted
cisco IOS software, C3560 software (C3560-1PSERVICESK9-M), version RELEASE SOFTWARE (fcl)
Copyright (c) 1986-2007 by Cisco Systems, Inc.
Compiled Thu €5-JuI-G7 22 by antonino
Would ymu like to terminate autoinstall? [yes]](https://unreal-labs.com/wp-content/uploads/2020/02/image-6.png?w=858)


")


